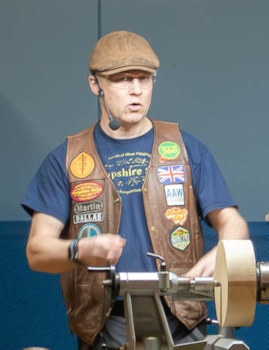
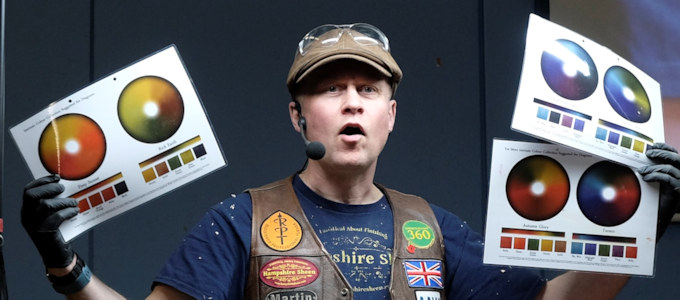
Martin Saban-Smith
Demonstration of Proportional Design
& Finishing Techniques
at MWCC Club Night on Thursday, 18th April 2024
Based in Four Marks, East Hampshire, Martin has been an ardent wood turner for
ten years and on the Register of Professional Turners since the last seven.
In 2015 he produced a range of waxes, oils, sealer and lacquers under the name
of Hampshire Sheen followed by blending his own range of water based colour dyes in
groups of shades that compliment each other - the Intrinsic Colour Collection.
He has expanded his online presence by presenting online free and paid-for
demonstrations via his YouTube channel and through Zoom and founded
‘Woodturning360’ - a solely online turning club that features monthly
demonstrations of professional turners from around the world.
Leaving Social Media behind, tonight will be his first 'on the road'
demonstration for quite some time.
From a background of photography, Martin's emphasis on turning appears more
artistic than practical, but he always explained his reasons for the creative
skills he was about to do next during his demonstration of turning & finishing
together with the mathematics he used to produce such a pleasingly proportioned
finished composition.
As a photographer and a graphic designer in previous years, he was well used to
the composition principle known as 'Rule of Thirds' but for some time now, he
has been turning bowls using a similar but different rule; "The Golden
Ratio" which appears in countless places in nature and is used extensively
in art, graphic design & architecture.
It is basically the number 1.618 which you use to divide your
largest dimension (diameter of a bowl/platter; height of hollow form) to provide
a natural proportion. Dividing only once might be wrong for the piece, so just
divide by the 1.618 again and again until it looks right while still preserving
this natural proportion. For example, by eye you might consider the foot
of a 10" (254mm) bowl seems fine at your optimum chuck diameter of 50mm but using the golden
ratio for a 250mm diameter bowl, guides you to a 60mm foot (because the adjacent Golden
Ratio option of 97mm looked inappropriate).

courtesy of Martin Saban-Smith
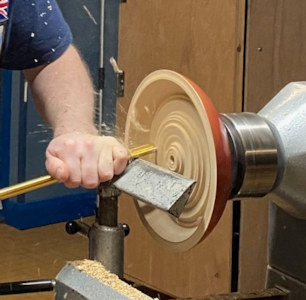
TURNING
With a 10" by 3" Ash bowl blank held between a screw chuck and live tail centre
ready to turn on the lathe, Martin stopped to remove his watch and health
monitors from his left wrist and put them on his right wrist. He is naturally
left-handed but for turning, even in cold conditions, he keeps his left hand and
forearm completely bare to remove any possibility of anything that could snag
and drag him into danger. At home, he wears a full face shield but for the
sake of being audible tonight, has compromised by wearing all-round safety
glasses.
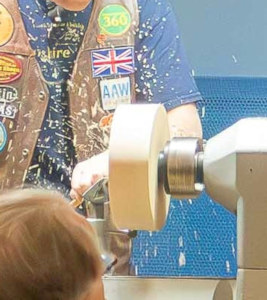
Martin had selected his standard Sorby bowl gouge with a
50º bevel, which he finds less aggressive than smaller angled bevels. He
discussed his 'Three Points of Contact' control of the gouge comprising of
toolrest, right hand & body. Because he is left-handed, Martin finds a
pull cut comes naturally for him to control the tip of the gouge and commented that push cuts can so easily end
up diving into the wood involuntarily. With the gouge handle down low on
his thigh and an open flute, he tidied up the edge of the blank before finishing
off with a careful push stroke once it was trued all round.
The centre of the face was squared off and dividers used to mark out the spigot
required for his One Way gripper jaws. He used a ½" spindle gouge to
square off the corners of an 8mm spigot and quickly removed the waste.
Next came the maths. As we knew the final diameter of the bowl, we needed to
work out the diameter of the foot; from there we could work out a proportional
height of the bowl and finally the thickness of the wall. So a 250mm
diameter bowl would look well with a 60mm foot; the 3" blank could only at best
accommodate a 60mm height (even though this leads to wasting 15mm from the
eventual top of the bowl blank); the final dimension to consider is the wall
thickness.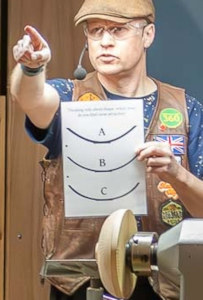 From the table above, a rim size of 14mm seems unnecessarily too thick while 5mm
feels too thin for a piece of Ash, so 9mm would be the best plan. Thus nothing
is left to be gauged by eye other than the shape of the curve. Martin
asked which of his 3 drawn curves we preferred. Eight engineering minded
of us chose curve A which resembles a suspended coil; another nine chose B
which is a perfect arc of a circle and 20 chose C which is a natural part of a
Fibonacci spiral. We then discussed if we were given a spectacular piece
of wood to turn, would we be more conscious of the final shape or for keeping as
much of this beautiful wood as possible. The consensus favoured shape, to which
Martin said, "Good! Then you won't mind me discarding 15mm off the top of
this piece of Ash in order to keep proportional shape."
From the table above, a rim size of 14mm seems unnecessarily too thick while 5mm
feels too thin for a piece of Ash, so 9mm would be the best plan. Thus nothing
is left to be gauged by eye other than the shape of the curve. Martin
asked which of his 3 drawn curves we preferred. Eight engineering minded
of us chose curve A which resembles a suspended coil; another nine chose B
which is a perfect arc of a circle and 20 chose C which is a natural part of a
Fibonacci spiral. We then discussed if we were given a spectacular piece
of wood to turn, would we be more conscious of the final shape or for keeping as
much of this beautiful wood as possible. The consensus favoured shape, to which
Martin said, "Good! Then you won't mind me discarding 15mm off the top of
this piece of Ash in order to keep proportional shape."
Although tonight's maths was starting with the largest factor (the bowl width)
and used to calculate down to the narrowest factor (bowl thickness) by dividing,
Martin emphasized that if, for example, you needed to provide a piece with a
specific foot size, then the 1.618 still works by multiplying to find a
proportionate bowl width and by dividing to find the appropriate wall thickness.
He drew a 60mm circle for the outer edge of the foot. Martin's preference is a
small coved edge to the side of the foot that feels comfortable to his finger
tips;
not so small to be thought an accident; not so big to look like a pedestal. Next, he drew a line around the rim 60mm up the side of the blank
from the bottom line of the foot. The final shape of the curve is visualised to
run from bottom centre of the foot, onwards beyond its outer edge and to
end up vertical by the rim's pencil mark. With this in mind, he
started just short of the foot line to leave about a 3mm step foot before
removing the bottom corner with his bowl gouge and working towards the Fibonacci
curve. He stopped regularly, took a step back to view and then felt the surface
in order to see where on the curve he needed to go slightly deeper with his next
cut.
FINISHING
The quickest way to finish is to leave the best tool finish you can before
resorting to abrasives. Martin favours a bowl sander with the lathe turning at
the same speed he finished with his gouge. While facing square to the rails, he
can keep the sander in contact by swinging his arms without twisting his back.
Contact is made at the 7:30 position (as viewed down the rails towards the head
stock) so he could see
the whole length of the sanding as he worked from foot to rim. Once again,
he stopped regularly to check for any tear-out patches that still needed work
before moving down the sanding disc grits. He admitted that he might use the coarser
grits more than once but will only use fresh abrasives for the finer grits.
Inward pressure is light enough to ensure the pad keeps rotating without
creating too much heat; particularly important for exotic or oily woods which
can readily check/crack (eg Yew) and is another reason to progress down the
sanding disc grits as soon as each has abraded the previous grit's scratches away. As
some finishing product was going to be applied, Martin tends to stop after 400
sanding grit because the smoother the surface, the harder for the product to grip/key
to.
After sanding, particles need to be cleared out of the grain, particularly with open
grain wood.
First choice for Martin would have been air jet (not available tonight); next
would be Liming Brush or otherwise by Methylated Spirits. He had a Libéron
Liming Brush with long stiff bronze bristles although he did warn against using
a 'suede cleaning' brush which despite having short copper/brass bristles, will
easily scratch and produce a wholly inferior result.
The choice of finishing type needs to consider which is most appropriate.
▪ Bright & Shiny ▪ Satin ▪ Flat ▪ Food Safe ▪ Scratch Resistant ▪
e.g. Big pieces aren't flattered with large reflective high gloss surfaces
but can be enhanced with a matt finish.
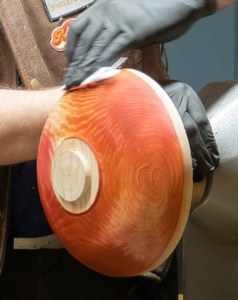
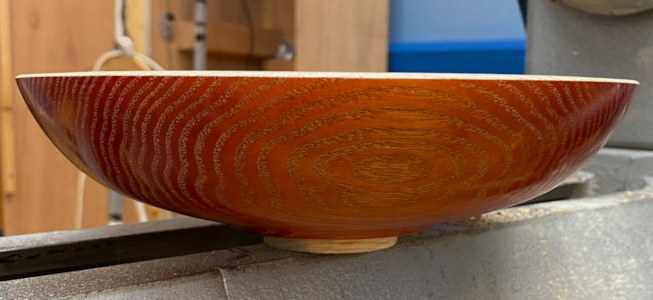
The outside of this Ash bowl didn't have a lot of figure so would benefit with
some co-ordinated colour. We are not trying to hide the wood so a dye
would be preferable to a stain.
♦ a DYE is colour designed to penetrate,
♦ a STAIN is diluted paint that lies on the surface.
Dyes can be either 'spirit' or 'water' based and Martin asked us to select one
of his water based wood dye ranges - Tonight we chose 'Fiery Sunset'.
 As
dyes & stains imply, disposable gloves are essential. Martin uses water
based dyes because they are slower to dry than spirit and therefore one has more
time when applying by hand. He could have applied with an airbrush but
tonight he used a folded kitchen roll with a couple of splashes of the first
colour (Ruby) which he dabbed with little or no pressure in patches before, most
importantly, feathering the colour out at the edges. The wood naturally
draws in the dye so it's important not to apply it heavily or else some areas
won't be able to absorb added colours. He used a new folded paper towel for the
next colour (Burnt Orange) in a clear area ending again with feathering out at
the edges, either leaving gaps or else working into the previous feathered
edges. A third colour (Flame) was applied as before. After a short rest,
he used a clean paper towel with the lathe turning to dry off the surface.
With the lathe stopped, second coats of the same colours were applied more or
less in the same places, this time feathering in all the gaps although the
second coats wouldn't penetrate as much as the previous coat underneath. After
further time and drying off with a clean paper towel again, the lathe was
stopped, the long grain surfaces were identified and subsequently hand sanded
back with the same disc grit that had been used last when sanding (i.e. 400 grit in
our case). The Liming Brush was used again before the long grains were
dabbed and feathered as before with the paler Honey colour.
As
dyes & stains imply, disposable gloves are essential. Martin uses water
based dyes because they are slower to dry than spirit and therefore one has more
time when applying by hand. He could have applied with an airbrush but
tonight he used a folded kitchen roll with a couple of splashes of the first
colour (Ruby) which he dabbed with little or no pressure in patches before, most
importantly, feathering the colour out at the edges. The wood naturally
draws in the dye so it's important not to apply it heavily or else some areas
won't be able to absorb added colours. He used a new folded paper towel for the
next colour (Burnt Orange) in a clear area ending again with feathering out at
the edges, either leaving gaps or else working into the previous feathered
edges. A third colour (Flame) was applied as before. After a short rest,
he used a clean paper towel with the lathe turning to dry off the surface.
With the lathe stopped, second coats of the same colours were applied more or
less in the same places, this time feathering in all the gaps although the
second coats wouldn't penetrate as much as the previous coat underneath. After
further time and drying off with a clean paper towel again, the lathe was
stopped, the long grain surfaces were identified and subsequently hand sanded
back with the same disc grit that had been used last when sanding (i.e. 400 grit in
our case). The Liming Brush was used again before the long grains were
dabbed and feathered as before with the paler Honey colour.
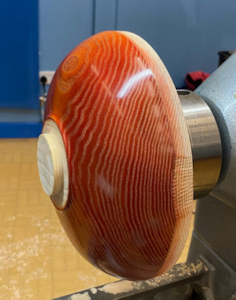
Before waxing and depending upon how
absorbent the wood, it might need to be Sanding Sealed to prevent the end grain
sucking in more embellishing wax colour than could be absorbed into the long grain. Box
Wood and Yew might not need any or at least only a single coat; open grained
wood like Ash is likely to need at least one coat of sealer. Of the three types
of Sanding Sealer, Martin finds Shellac too sticky, Acrylic dries too slowly
leaving Cellulose as the best option. Whichever you use, Martin warned
that it must be applied quickly and evenly to avoid rippled 'tide marks'
spoiling the effect of any added embellishing wax used to enhance the grain as
he had planned for this piece of Ash. We had the choice of black, bronze (brilliant for Sepele, Walnut) or gold. These Embellishing Waxes worked like gilt creams but
don't need 24 hours to set. Instead, they include Carnauba and Micro-Crystalline
waxes plus a pigment, which if applied frugally, will be set within half an
hour. The consensus was for gold.
Martin decided to add a very thin final coat of Microcrystalline Wax
buffed up to a shiny chatoyant finish. When buffing, he warned that it was
important to use no more than a light finger pressure or else the frictional
heat will melt onto the buffer and you won't get the smooth deep gloss finish
you wanted.
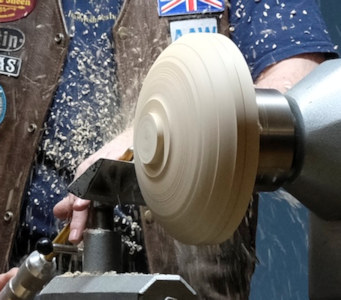
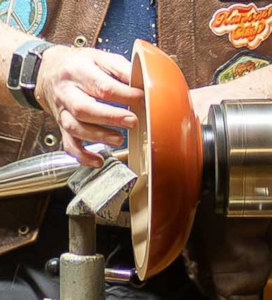
The piece was then mounted onto the prepared spigot and the top 15mm or so waste
wood above the pre-marked height line was quickly nibbled away with pull cuts.
The Golden Ratio planned Rim thickness was 9mm which was pencilled in. Trying
to cut Ash accurately at this thickness does need to be done in stages so that
the wood below supports your final inside cut without letting the wood vibrate
and spoil the cut. Starting near the centre, Martin turned away about a
3cm bowl shape depth and
worked his way out towards the pencil line. Once close to the thickness
mark, he used the bevel to parallel the outside edge down to this first cleared
depth before stopping to look and feel the inside. This had to be right before
moving onto the next 3 or 4cm hollowing out.
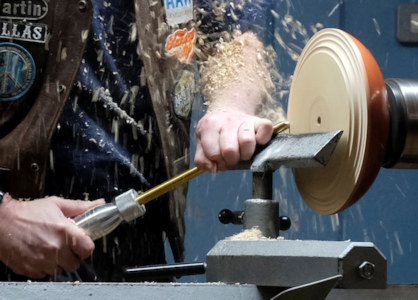
He preferred to make every cut as a finishing
cut, because it gives one muscle memory practice for the final pass. He
was happy to leave a cone in the centre as this added structural strength to
supporting the upper sides and could be easily turned away later.
Having taken care in keeping the inside wall smooth across all the stages and
parallel to the outside and with any centre cone turned away, the final
hollowing cuts were a sweep with the handle starting from down and ending higher
as the gouge tip was guided to the centre with its bevel ending up parallel to
the bowl's rim. With the lathe turning, the inside surface was sanded with a
small round pad powered by a drill making contact at about the 4 o'clock
position (as viewed down the rails).
Lack of time didn't allow for the piece to have the inside treated with numerous
coats of finishing oil (some of which require 24 hours after final application) nor to be held in Cole Jaws and the tenon
removed but Martin finished tonight's piece with his powered abrasive pad to
create a small bevel to remove the sharp edge of the bowl's rim. This feature
also outlined and enhanced the decoration.
Martin highlighted that oils that dry (eg Danish Oil) are far more durable than
waxes with regard to anything hard, sharp or moist being put into a bowl.
(photos by Vic Russell, Andy Ogilvie &
Natalja Saban-Smith)
<to
Pro Index>
Martin Saban-Smith is a Registered Professional Turner (RPT).
He can be found at
<www.hampshiresheen.com>
Facebook: <www.facebook.com/msabansmith>
YouTube: <www.youtube.com/c/msabansmithwoodturning>